Sunday, April 21, 2019

Siri Shortcuts, Screen Time, and iMessage Screen Effects Coming to macOS This Year

Siri Shortcuts, Screen Time, and iMessage Screen Effects Coming to macOS This Year


iOS apps and features including Shortcuts, Screen Time, and iMessage effects will be coming to macOS later this year, after they're first unveiled at Apple's Worldwide Developer's Conference in June. The information was shared today by 9to5Mac's Guilherme Rambo, who spoke with people familiar with the development of macOS 10.15.

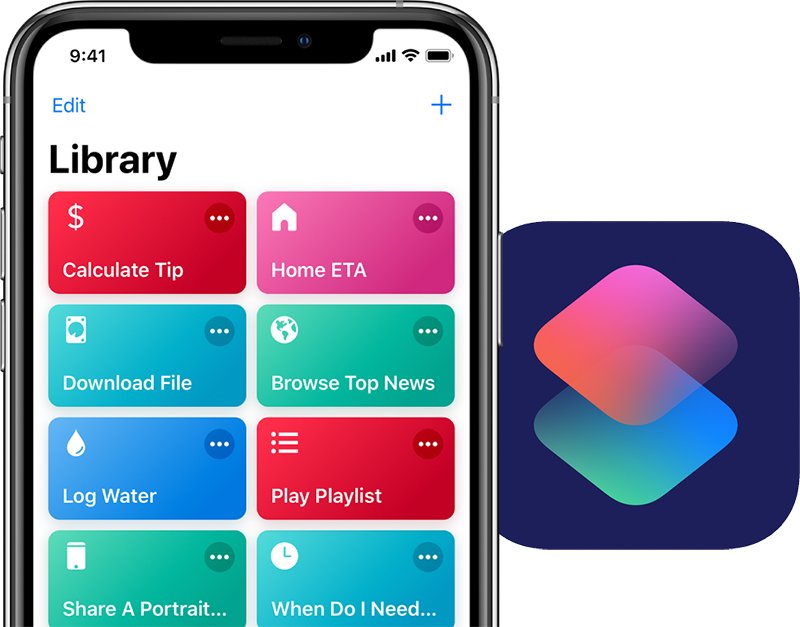
The major update to macOS, which is expected to launch in the fall, will include support for Siri Shortcuts. Apple updated the previous Workflow app for iOS to become SiriShortcuts in September 2018, alongside the release of iOS 12. It allows you to create multi-step automations that you can initiate with a simple Siri command.


Today, Shortcuts has expanded to numerous third-party apps like American Airlines and Caviar. Later this year, Mac computers will get "system-wide" support for Siri Shortcuts, according to today's report.


Secondly, macOS 10.15 will see the addition of Screen Time, which tracks your device usage and reports back to you at the end of each week with statistics on what apps you use the most. Parents can use the feature to limit the time their kids spend in certain apps, and people trying to take a break from social media can set time limits on apps like Instagram and Twitter.


On macOS, this feature will work essentially the same as it does on iOS. It'll be housed in a new panel in System Preferences to customize its settings, and an overlay will appear when time limits are exceeded, where you can close the app or bypass the Screen Time lock with a passcode.


Lastly, macOS will be getting iMessage screen effects that have been exclusive to iPhones and iPads for a few years. These include full screen effects like Echo, Balloons, Confetti, and Lasers. On current versions of macOS, when an iPhone user sends these effects and they're read on a Mac, the iMessage screen on Mac simply states "Sent with [Effect Name]" below the message.


Today's news follows previous reports about Apple's plans to tie the iOS and macOS ecosystems more closely together. This includes letting developers release universal apps that work across iPhone, iPad, and Mac devices, which could happen by 2021. Last year at WWDC, Apple also ported a few iOS apps to macOS for the first time, including Home, News, Voice Memos, and Stocks.Sponsor ads:

Gihosoft RePicvid Free Photo Recovery Software provides a free photo recovery software for windows to help users recover the deleted or lost photo for free.

If you lost data after you updated to a new iPhone, you can always use Gihosoft iPhone Data Recovery to get the data back from the old iPhone or backup.You may also like: iphonerecovery.com

How to Silence the Ringer on Your iPhone


Master your iPhone in one minute a day:

Sign up to iPhone Life's Tip of the Day Newsletter and we'll send you a tip each day to save time and get the most out of your iPhone or iPad.

To silence your iPhone's ringer, first locate the Ring/Silent switch on the top left side of your iPhone :


Push the switch back so the orange shows.


Your iPhone is now in silent mode. This means calls and alerts will be muted. Alarms set in the Clock app will not be muted.


To turn silent mode off, simply push the switch forward so the orange no longer shows.


You can still be alerted to calls and notifications if you have Vibrate on Silent on. But if you don't want your device to make even that much noise, you can also shut off the vibration feature.


Open Settings and tap Sounds & Haptics (or Sounds if your iPhone is earlier than iPhone 7).


Toggle Vibrate on Silent to off.


By putting your iPhone in silent mode with vibration off, your phone will not distract you with any alerts or incoming calls (with the exception of Clock alarms.)


Master your iPhone in one minute a day:

Sign up to iPhone Life's Tip of the Day Newsletter and we'll send you a tip each day to save time and get the most out of your iPhone or iPad.Sponsor ads:

Gihosoft RePicvid Free Photo Recovery Software provides a free photo recovery software for windows to help users recover the deleted or lost photo for free.

If you lost data after you updated to a new iPhone, you can always use Gihosoft iPhone Data Recovery to get the data back from the old iPhone or backup.You may also like: iphonerecovery.com

Tuesday, April 2, 2019

How to Use the Home App to Control HomeKit Devices


How to Use the Home App to Control HomeKit Devices

The Home app is what allows you to easily control your HomeKit-compatible devices using your iPhone, iPad, or Mac. You can use the app to do everything from turning on smart lights or adjusting a smart thermostat to opening and closing automated window shades.


Before you start with the app, make sure the smart accessory that you want to use with it is HomeKit-enabled. If your smart product has the label "Works with Apple HomeKit" on the product packaging, you can add it as an accessory in the Home app. If you're still not sure, see Apple's regularly updated list of compatible devices on its website.


Adding an accessory to your smart home setup is fairly straightforward, but there are a few areas where it's not entirely intuitive, so check out our article about adding accessories for more.


Once you've added your devices to the Home app, you can edit the information for them on your iOS device or Mac. On your iPhone or iPad, press and hold an accessory, then tap Settings. On your Mac, double-click the accessory, then click Settings.


From this screen, you can change the accessory's name and the room in which it's located, and you can group the device with other accessories. You can also add the device to your Favorites to access and control it in Control Center, the Home tab, and on your Apple Watch.


To turn a HomeKit accessory on or off using the Home app, simply tap the device (or click it on Mac). To adjust additional device settings, like light bulb brightness for instance, press and hold (or double-click on Mac) instead. You can also create scenes to activate multiple accessories in one go, and even share access to your HomeKit devices with others.


In addition, you can use Siri to turn on and control your devices. The Siri commands you use will obviously depend on the type of accessory, but a couple of examples might be "Turn on the living room light" or "Open the garage door," or you could ask Siri to check the temperature of a thermostat, for example. You can find more information about using Siri to control HomeKit accessories by clicking here. Sponsor ads:

Gihosoft Free iPhone Data Recovery:https://www.gihosoft.com/iphone-data-recovery-free.html

Gihosoft iPhone Data Recovery Free

Free iPhone Data Recovery Software for Windows/Mac

Recover up to 12+ types of files, including contacts, SMS, photos, WhatsApp, Viber, notes, etc.

Restore lost data from iOS devices directly or from iTunes and iCloud backup

Recover iPhone data lost due to iOS upgrade/jailbreak, accidental deletion, device lost or broken

Support all the latest iPhone, iPad and iPod Touch

Both Free and Pro version.

If you lost data after you updated to a new iPhone, you can always use Gihosoft iPhone Data Recovery to get the data back from the old iPhone or backup.You may also like: iphonerecovery.com

If you use android phones, please choose Gihosoft Android Data Recovery.

With Gihosoft Android Data Recovery, no longer afraid of data loss!

Must read:Youtube video downloader for pc

Gihosoft RePicvid Free Photo Recovery Software provides a free photo recovery software for windows to help users recover the deleted or lost photo for free.

Jihosoft Android Data Recovery: the best Android Data Recovery software for Windows and Mac to recover deleted contacts, messages, photos, videos, WhatsApp and etc from Android devices.Tips:How to transfer messages from iPhone to iPhone

Jihosoft File Recovery:Recover deleted, Lost, formatted, or corrupted files from PC, flash drive and memory card easily & safely

Also Read:Update Android

Also Read:Top 8 Best Alternative Websites to TamilGun in 2019

Also Read:Free Download FRP Bypass APK for Android 2019

Also Read:Best 10 Movie4k Alternative Websites for Movie Streaming 2019

Also Read:Top 32 Best Proxy and Mirror Sites to Unblock Fmovies 2019

Also Read:Best Torrent Search Engine Sites to Find Your Favorite Torrents 2019

Also Read:5 Best Sites Serving as Alternatives to TheWatchSeries Online 2019

Tuesday, February 26, 2019

Fix "iPhone Deletes All My Music" with iTunes


Fix "iPhone Deletes All My Music" with iTunes

If your iPhone has deleted your music mysteriously, you can manually restore the music to your iPhone from iTunes. To add music from iTunes library to your iPhone :

Step 1: Launch the iTunes application on your computer and then connect your iPhone using a USB cable.

Step 2: Once your device is detected select it and then click on Summary in the left sidebar menu.

Step 3: Then navigate to the options section and check the “Manually manage music and videos” box.


Step 4: Once you have done that, then you can add the deleted music back to your iPhone from PC by just dragging and dropping.


Once you finish the process, you will have the deleted Music library back to your iPhone.


Sponsor ads:Hack Someone’s Cell Phone With Just Their Number

How to Transfer Data to New iPad


Did you purchase a new iPad? A newly purchased tablet can be exciting, until it gets time to transfer all your apps and data from the old device to the new one. Most people struggle with the processes involved and end up giving up and starting afresh. If you’ve purchased a new device, this article will help you transfer data from your old iPad to the new one.

You can primarily use iCloud or iTunes to move data to the new iPad. Either of them works very well, but you’ll need to first create a backup of the old iPad to ensure you move all the data. Let’s begin with using iTunes.
How to Transfer Data to New iPad using iTunesSponsor ads:Hack Someone’s Cell Phone With Just Their Number

Before we begin, it is important to note that having an encrypted backup will help move all your passwords to the new device and reduce the time it will take to set up the iPad. That said, here’s a step by step guide to transfer data to a new iPad using iTunes.

Step 1: Connect the old iPad to your computer and then launch iTunes (ensure you are using an updated version of iTunes.)

Step 2: Click on the iPad icon when it appears and then click “Back Up Now.” Click on “Encrypt Backup” and add a password. Backup your apps when prompted.


Step 3: When the backup is complete, connect the new iPad to your computer and “Slide to Set up”.

Step 4: Follow the instructions to complete the set-up process and then select “Restore from iTunes Backup.”

Step 5: Select “Restore from this Backup” in iTunes and then choose a recent backup from the list. Enter the password when asked.


You can then re-download all your photos, music and apps and you are ready to use the new iPad.
How to Transfer Data to Your New iPad using iCloud

Alternatively, you can use iCloud to transfer data from an old iPad to a new one. Here’s how to do that.

Step 1: Even if you’ve set up iCloud to automatically backup the old iPad, it is still a good idea to do a manual backup to ensure the data you have is the most recent. To do that connect the device to Wi-Fi and then go to Settings > iCloud > Backup and then Tap “Back Up Now.”


Step 2: When the backup is complete, turn on the new iPad and then “Slide to Set up.”

Step 3: Follow the instructions and then select “Restore from iCloud Backup.”

Step 4: Sign in to iCloud and then tap “Next.”

Step 5: Agree to the “Terms and Conditions” and then tap “Confirm.”

Step 6: Choose the most recent backup. Enter your iCloud password.


Keep the device connected to a Wi-Fi network until the process is completed.
Selectively Transfer Data to New iPad


Sponsor ads:

Gihosoft Free iPhone Data Recovery:https://www.gihosoft.com/iphone-data-recovery-free.html

Gihosoft iPhone Data Recovery Free

Free iPhone Data Recovery Software for Windows/Mac

Recover up to 12+ types of files, including contacts, SMS, photos, WhatsApp, Viber, notes, etc.

Restore lost data from iOS devices directly or from iTunes and iCloud backup

Recover iPhone data lost due to iOS upgrade/jailbreak, accidental deletion, device lost or broken

Support all the latest iPhone, iPad and iPod Touch

Both Free and Pro version.

If you lost data after you updated to a new iPhone, you can always use Gihosoft iPhone Data Recovery to get the data back from the old iPhone or backup.You may also like: iphonerecovery.com

If you use android phones, please choose Gihosoft Android Data Recovery.

With Gihosoft Android Data Recovery, no longer afraid of data loss!

Must read:Youtube video downloader for pc

Gihosoft RePicvid Free Photo Recovery Software provides a free photo recovery software for windows to help users recover the deleted or lost photo for free.

Jihosoft Android Data Recovery: the best Android Data Recovery software for Windows and Mac to recover deleted contacts, messages, photos, videos, WhatsApp and etc from Android devices.Tips:How to transfer messages from iPhone to iPhone


jihosoft Free iPhone Data Recovery

Thursday, February 21, 2019

How to Share iTunes Library Between Computers - Using Home Sharing 2019


How to Share iTunes Library Between Computers - Using Home Sharing

One of Apple’s official ways to share iTunes library between computers is with Home Sharing. This works well enough in many cases, but it still has its limits:


You can’t share your iTunes library with computers that are signed in with different Apple IDs, which means you can’t share iTunes library between users.


Your computers should be on and awake, and so does iTunes.


Your computers need to be networked for the transferring to occur.


You can’t be individually selective about which files you want to transfer and which you don’t - it just happens automatically.


In case you still want to use Home Sharing, though, this is how you can do it:


Launch iTunes.


Sign in with your Apple ID.


Make sure that you are using the same Apple ID for every device in your home.


In iTunes, go to File > Home Sharing > Turn on Home Sharing.

You can drag some specific iTunes contents from the shared library to your iTunes library. But note that iTunes home sharing always not working.Also Read:Voice Changing Apps & Software for Skype


How to Share iTunes Library between Computers - Using Music Sharing

Alternatively, you can use music sharing. This is similar to Home Sharing, but you must have iTunes open on all the devices that are sharing. There are a few disadvantages to this method:Sponsor ads:Fix SD Card Error on GoPro Hero


Again, you must be on a network. Your computers should be in the same network.


Your computer and shared iTunes should be on and awake that others can access your library.


It only works with DRM-free content. This means that if there are any digital rights management restrictions on your music, you won’t be able to use Music Sharing to share the files.


Apple Music content can’t be shared with these method. (Though this is also true for Home Sharing.)


It can be a privacy concern because if Music Sharing isn’t password protected, anyone connected to your network can see your library.


Launch iTunes.


Go to Edit > Preferences (Mac: iTunes > Preferences).


Click where it says “Sharing.”


Click the box next to, "Share my library on my local network." You can specify certain types of content or playlists that you want to share, or let it share everything.

Tips

You can customize your library by going to Edit > Preferences (Mac: iTunes > Preferences), and then changing the name under the General tab by typing the new name in the box next to “Library Name.”Worth reading:download youtube 1080p


How to View Your Shared Library on Another computer?


Open iTunes.


Click “Music” at the top left corner of the iTunes window.


Go to Edit > Shared Libraries, and click “Done.” You should now be able to see the libraries that you share with other devices that have iTunes open. Click the name of the library to examine what’s in it.Sponsor ads:


Gihosoft Free iPhone Data Recovery:iphonerecovery.com


Free iPhone Data Recovery Software for Windows/Mac


Recover up to 12+ types of files, including contacts, SMS, photos, WhatsApp, Viber, notes, etc.


Restore lost data from iOS devices directly or from iTunes and iCloud backup


Recover iPhone data lost due to iOS upgrade/jailbreak, accidental deletion, device lost or broken


Support all the latest iPhone, iPad and iPod Touch


Both Free and Pro version.


If you lost data after you updated to a new iPhone, you can always use Gihosoft iPhone Data Recovery to get the data back from the old iPhone or backup.


Top 10 Best FRP Bypass Tools to Bypass Google Account on Android Device 2019


Worth reading:download youtube 1080p


If you use android phones, please choose Gihosoft Android Data Recovery


Jihosoft Android Data Recovery: the best Android Data Recovery software for Windows and Mac to recover deleted contacts, messages, photos, videos, WhatsApp and etc from Android

Monday, February 18, 2019

3 iPhone Optimizers 2019


2 Memory & Disk Scanner Pro

The iPhone Optimizer is similar to Umate Pro, but doesn’t carry the power features Umate has. It is simplistic in nature and will help you clear out junk files. The app also gives clear device’s system information. Other functions of the app include: disk scan, show system information, and how much disk space you have as well as your CPU usage and RAM usage.


3 360 Security

This utility is quite useful, and when I say useful, I mean it will help you in a lot of ways. For starters, it takes care of your photos, starting with compressing your photos as well as deleting duplicate photos and screenshots. This iPhone Optimizer also comes with a battery saver which helps user manage their iPhone battery better. In all, the app optimizes performance, speed, memory, as well as showing the true state of your iPhone battery.

It’s suggested to restart your iPhone after upgrade, and you can keep all your personal settings by restarting with apps on in background.


4 System Status

System status does one thing well, and it is providing detailed stats of your device’s status as regards to system resources and battery. And the reason is to enable you make changes to your device through and seeing if they have an effect on your devices performance.


Sponsor ads:

Gihosoft Free iPhone Data Recovery:https://www.gihosoft.com/iphone-data-recovery-free.html

Gihosoft iPhone Data Recovery Free

Free iPhone Data Recovery Software for Windows/Mac

Recover up to 12+ types of files, including contacts, SMS, photos, WhatsApp, Viber, notes, etc.

Restore lost data from iOS devices directly or from iTunes and iCloud backup

Recover iPhone data lost due to iOS upgrade/jailbreak, accidental deletion, device lost or broken

Support all the latest iPhone, iPad and iPod Touch

Both Free and Pro version.

If you lost data after you updated to a new iPhone, you can always use Gihosoft iPhone Data Recovery to get the data back from the old iPhone or backup.You may also like: iphonerecovery.com

If you use android phones, please choose Gihosoft Android Data Recovery.

With Gihosoft Android Data Recovery, no longer afraid of data loss!

Must read:Youtube video downloader for pc

Gihosoft RePicvid Free Photo Recovery Software provides a free photo recovery software for windows to help users recover the deleted or lost photo for free.

Jihosoft Android Data Recovery: the best Android Data Recovery software for Windows and Mac to recover deleted contacts, messages, photos, videos, WhatsApp and etc from Android devices.Tips:How to transfer messages from iPhone to iPhone


jihosoft Free iPhone Data Recovery

Monday, February 11, 2019

Download rootlessJB jailbreak for iOS 12-12.1.2


WHAT IS ROOTLESSJB?

rootlessJB is an iOS 12.0-12.1.2 jailbreak based on Brandon Azad’s voucher_swap exploit. It is developed by the renowned security researcher Jake James.

As opposed to a “root” jailbreak such as unc0ver or Electra, a rootless jailbreak only has read and write permissions to the var subdirectory.

A “root” jailbreak, on the other hand, has full read and write-level access to the entire root filesystem of an Apple device.


Despite offering limited support, rootlessJB is currently the only iOS 12 jailbreak tool with tweak injection capability.

Although Brandon’s exploit supports A12 devices (iPhone XS, XS Max, and XR), they are incompatible with rootlessJB. If you have a compatible A9-A11 device, follow the tutorial given below.
COMPATIBILITY
FIRMWARE


12.0


12.0.1


12.1


12.1.1


12.1.2
DEVICE


iPhone 6S


iPhone 6S plus


iPhone SE


iPhone 7


iPhone 7 Plus


iPhone 8 and 8 Plus iPhone X


iPad (2017) (5th Generation)


iPad Pro (12.9 in.) 1st generation


iPad Pro (9.7 in.)


iPad Pro 10.5″ (2017)


iPad Pro 12.9″ 2nd Gen (2017)


iPad (2018)


iPhone XS/XS Max (incompatible)


iPhone XR (incompatible)
REQUIREMENTS


A compatible iPhone, iPad or iPod touch


iOS 12.0-12.1.2 firmware


Internet connection
HOW TO JAILBREAK IOS 12-12.1.2 WITH ROOTLESSJB
INSTALLATION

Step 1 Open Safari web browser.

Step 2 Go to Ignition.fun and install the app.

Step 3 Open the app and go to the apps sections. Select Jailbreaks, scroll down and select rootlessJB iOS 12.1.2 jailbreak.


Step 4 Tap Get and wait for the app to get installed.

Step 5 Open the stock Settings app, go to General > Profiles & Device Management and trust the certificate associated with rootlessJB.
USAGE

Step 6 Run the app from your home screen and tap Jailbreak to start the jailbreak process. Make sure the “Tweaks” option is toggled on or else tweak injection will not work.

Step 7 Wait for your device to respring. Once the SpringBoard restarts, your device will be put in jailbreak mode.


The voucher_swap exploit has a solid success rate.

It almost always puts your device in the jailbreak state on the very first try. However, if it doesn’t work the way it’s supposed to, simply restart your device and enable Airplane mode before running the app again.
CHECKING JAILBREAK STATUS (OPTIONAL)

This jailbreak tool is very “barebones” at the moment and it doesn’t notify the user about the jailbreak state of the device.

If you want to ascertain that your device is jailbroken, you must SSH into your iPhone or iPad and check whether or not it succeeds.
FUTURE DEVELOPMENT

Here’s the full list of improvements that you can expect from this jailbreak in the future –


SSH from device


Sandbox patches


Better tweak patcher


Fix app installation


A12 devices support


Fix preference loader


Package installer (Cydia replacement)

Sponsor ads:

Gihosoft Free iPhone Data Recovery:iphonerecovery.com

Free iPhone Data Recovery Software for Windows/Mac

Recover up to 12+ types of files, including contacts, SMS, photos, WhatsApp, Viber, notes, etc.

Restore lost data from iOS devices directly or from iTunes and iCloud backup

Recover iPhone data lost due to iOS upgrade/jailbreak, accidental deletion, device lost or broken

Support all the latest iPhone, iPad and iPod Touch

Both Free and Pro version.

If you lost data after you updated to a new iPhone, you can always use Gihosoft iPhone Data Recovery to get the data back from the old iPhone or backup.

Top 10 Best FRP Bypass Tools to Bypass Google Account on Android Device 2019

Worth reading:download youtube 1080p

If you use android phones, please choose Gihosoft Android Data Recovery


Jihosoft Android Data Recovery: the best Android Data Recovery software for Windows and Mac to recover deleted contacts, messages, photos, videos, WhatsApp and etc from Android

Wednesday, January 9, 2019

How to Turn Off “Find My iPhone” on iCloud


How to Turn Off “Find My iPhone” on iCloud

If you don’t have the iPhone at hand but you know the iCloud account and its password, you can remotely turn off the “Find My iPhone” from your device through iCloud. Just follow:


Open a web browser and go to icloud.com page.


Log in with the iCloud account and password.


There, find and click “Find iPhone”.


At the top, click “All Devices” and select the device that you want to turn off “Find My iPhone”.


Then choose “Erase iPhone” and confirm it.


The “Find My iPhone” will be turned off when your iPhone connects to internet. Please note that everything will be erased from your iPhone as well.

Sponsor ads:

Gihosoft Free iPhone Data Recovery:https://www.gihosoft.com/iphone-data-recovery-free.html

Gihosoft iPhone Data Recovery Free

Free iPhone Data Recovery Software for Windows/Mac

Recover up to 12+ types of files, including contacts, SMS, photos, WhatsApp, Viber, notes, etc.

Restore lost data from iOS devices directly or from iTunes and iCloud backup

Recover iPhone data lost due to iOS upgrade/jailbreak, accidental deletion, device lost or broken

Support all the latest iPhone, iPad and iPod Touch

Both Free and Pro version.

If you lost data after you updated to a new iPhone, you can always use Gihosoft iPhone Data Recovery to get the data back from the old iPhone or backup.You may also like: iphonerecovery.com

If you use android phones, please choose Gihosoft Android Data Recovery.

With Gihosoft Android Data Recovery, no longer afraid of data loss!

Must read:Youtube video downloader for pc

Gihosoft RePicvid Free Photo Recovery Software provides a free photo recovery software for windows to help users recover the deleted or lost photo for free.

Jihosoft Android Data Recovery: the best Android Data Recovery software for Windows and Mac to recover deleted contacts, messages, photos, videos, WhatsApp and etc from Android devices.

jihosoft Free iPhone Data Recovery

Tips:

How to transfer messages from iPhone to iPhone

Siri Shortcuts, Screen Time, and iMessage Screen Effects Coming to macOS This Year

Siri Shortcuts, Screen Time, and iMessage Screen Effects Coming to macOS This Year iOS apps and features including Shortcuts, Screen Time, a...